

Showing posts with label Nail Art. Show all posts
Showing posts with label Nail Art. Show all posts
Tuesday, 5 June 2012
Jubilee Nails
Being British I couldn't let the Queens Diamond Jubilee pass by without having a burst of patriotism and doing a jubilee manicure in our lovely Queenies honour could I. There's not much to say about my mani except that if I put both my hands together, tip to tip, I have a Union Jack flag but I couldn't manage a pic without serious peril to my camera sadly! For my polishes I used Nails Inc Bakers Street for the blue, and Nails Inc Villers Street for the red. I used China Glaze Snow for the white. The blue glitter is Pure Ice Strapless, and the red glitter is Barry M. I'm really pleased at how it came out, and I have had lots of compliments so it must look alright to others as well. So, without further ado *trumpet fanfare* I present in honour of you our lovely Monarch, my Jubilee Nails :)

Sunday, 29 January 2012
Funky Fingers Riot and BarryM Instant Effects Moon and Stars
Today I want to show you the mani I had on all week up until Friday! Yep, a whole week! It wore really well only showing some real tip wear and one small chip Friday. It was my birthday yesterday, so I HAD to change it for then of course, and I chose Ozotic Pro 505 and Ozotic Elytra for that (I will post about that later!) but I have posted that combination before too!
 I really liked this manicure, it kind of reminded me of all those things you could buy in the '80's early '90's with all the sun, moon and stars designs on them. Whole matching bedroom sets of curtains, bedding, lamp shades, rugs, the whole kaboodle! In fact I think I still have some curtains like that somewhere!
Funky Fingers Riot is a fantastic shade of purple, it does fall a little into 'blurple' territory as it is a blue based shade but most definitely a purple though. It is rich and vibrant, and being a fan of purple anyway it doesn't take a genius to realise that yes, of course, I loved it! It applied well with a normal drying time, and didn't present me with any issues. Having applied 3 coats and allowed to dry, I used BarryM Instant Effects gold foil polish as a stamping polish (these are great for stamping!), and went mad stamping away like a demon. I got LOTS of compliments on this, which is always nice of course and a good indicator that it is as nice as I hope, and not just me thinking it looks better than it actually does! Finally a liberal splash of shiny top coat, and stick a fork in me, I'm done. I hope you like it as much as I did, it was so simple to do, but looks so pretty.

Monday, 19 December 2011
Color Club Lumin-Icent and ManGlaze Matte is Murder nail art


Friday, 9 December 2011
Snowflake Nail Art Design
It is freezing here, with high winds, sleet, snow and ice so I thought I would do a manicure to match the seasonal weather. I wasn't entirely sure what I wanted to do until I saw this post here, on Copy That, Copy Cat. If you aren't already a follower of her blog you are missing out, she does some fab designs, go check her out and show her blog some love! It was her manicure that made me go oooooh I want to do THAT one, so I take no credit for the design, but I am happy with the results.

I started with Color Clubs Cold Metal from their foiled collection (I won the entire foiled collection from one of Traci's giveaways at The Trace Face Philes, so had to try this one, thanks Traci!) then I added some sparkle by doing some graduated tips using China Glaze Sexagon. Finally I added a very thin touch of Funky Fingers Baby Baby Baby (love the polish, want to vomit at the name urgh!)
That was the base sorted and I very nearly just left it as it was, it looked pretty and I have been suffering from the flu and a face full of goo. But onwards I went wielding my nail art brush with grim determination. I used one of those cheapie nail art 2 in 1 polish jobbies to do the snowflakes and it definitely needs a touch of thinner, but I think it did the job quite well.
So here is my version of a snowflake manicure, and I got a compliment on it twice today and I was only out of the house for a couple of hours so that was good! I am quite pleased with it, apart from macro shots being so unforgiving I promise it does look lovely when not in mega 'I can see every wobble your hand made there' mode. I hope you like it too :)

Monday, 31 October 2011
Happy Halloween and Spooky Nail Art!
Hi all y'all! First let me apologise, I have rather neglected my blog and all of you. It wasn't intentional, but I did have quite a lot of stuff to deal with and I won't bore you with the details apart from to say I have had a bit of a stressy bad time and just didn't get chance to blog. I am sorry, and thank you for your patience, but I am back now (YAY!)
Right, now without further ado, it is halloween! I love this time of year, first halloween, then bonfire night, and then not long until Christmas. I miss the summer sunshine, but all seasons have their beauty and Autumn/Winter has lots going on. Also my dogs hate the warm weather with a vengeance so it is good to see them happy too.
I decided, in the spirit of Halloween, I had to do a spooky manicure. I used a black polish underneath my pinky, middle and pointer fingers, and a white base under my ring finger and thumb. I then added Wet n Wild Behind Closed Doors on the pinky and middle fingers, and a coat of China Glaze Frosty on the white ones.
Once this was dry I got some white acrylic paint and painted a white circle on my index finger, and then I used just plain black polish and a fine brush to fill in the details. I really like this one, and it does look better in reality than it does on the pics, as macro mode shows where the black has streaked when I put a top coat on but it really doesn't show looking at it with the naked eye. I got my inspiration (ahem, okay I copied!) the Jack Skellington faces from Nails by Asami, hers look so much nicer than mine but I am happy with my results too. I also got a LOT of compliments and comments when I was out and about today so thats always a good indicator that I have done okay!
I hope you like my manicure, and HAPPY HALLOWEEN!

 |
| Fat Fingers! |
Wednesday, 21 September 2011
X&D Water Slide Decals

I like these, I like the effect and even though they don't feel thick or heavy on the nail, I have a feeling my nails would survive a few knocks with these on (I haven't tested this theory, and have no intention of doing so if I can help it!) They are available for purchase from here, they were delivered quickly and have a few different designs, as well as lots of other tempting goodies, and you can also check out their facebook page here. What do you think, do you like them or are they too fancy for your tastes? I hope you like them anyway, I know I do :)

(Product sent to me for review)
Thursday, 18 August 2011
Barielle Elles Spell, W7 Layering and Fiery Flame Nail Art
Today I have a new manicure for you. I put on a base of a single coat of random red/pink I picked up from my stash (I think it was China Glaze Ahoy) just to use as a colour base over my base coat, and then got to work.
 The two polishes I used were W7 Red Dazzle, and the wonderful Elles Spell by Barielle. I applied 2 thin coats of Red Dazzle first. This is a bright crimson red glitter, suspended in a red base, and applied very easily. Once this had dried, I decided that I had to apply Elles Spell over the top, just to add to the sparkly red fest I was having. Elles Spell is a flaky and I adore flakies! It has flakes of red which flash to gold and green, suspended in quite a sheer dark plummy red base, which ever way you look at it, it is gorgeous! If you don't have it already get it, and a back up! Click on the bottle pic for a close up :)
After I had layered these two, I took some pics, this was definitely a win! I am liking reds at the moment, so I was extremely happy with this. (I must get China Glaze Ruby Pumps and try this combination with it, I don't have it, sacrilegious I know!) You are going to want to click on this for close ups, just look at the colour and depth.

I wore this gorgeous creation for a whole day before I found myself with some spare time and, me being me I just couldn't leave it alone so.....I decided that it reminded me of glowing embers, it was practically alive so I added some nail art flames on the tips. I have never done flames before but I thought I would give it a go, and I think its turned out OK. Again I think this would work in many colour combinations, but for now I am sticking with this one and I am happily keeping it on for a couple of days. I hope you like it :)

Monday, 8 August 2011
Butterfly Wing Manicure Nail Art
OK so I know this design has now been done a bazillion times already, and I'm about to make it a bazillion and one. I hadn't done one of these butterfly mani's before and I always thought they looked really pretty and I fancied giving it a go after seeing pictures of other peoples and admiring them all. I googled some pics of Monarch butterflies for a few ideas and inspiration and had another drool over other peoples pics of their versions of this, and then I thought what the hell, I have plenty of remover if it turns out to be an epic fail so I got stuck in!
I started with using Virgin Vie Janet as a base colour (over my base coat/ridge filler) and then sponged on a little China Glaze Lighthouse, then gradually added China Glaze Free Love, and finally Finger Paints Chroma Coral, all sponged on to create a gradient effect. Next I used a cheap 2 way art pen/polish, using the thin brush to add on the black tips and some of the thicker lines, and then finished off the finer lines and touch ins with a nail art pen I had given to me. It looks just like a felt tip pen, and although trying to get an even flow through the nib without it drying up was tricky, it did the job. Last part was to add the white spots, I just used the pointy end of an orange stick and Rimmel white nail tip polish. Once dry I slapped on a couple of coats of top coat to seal it all in, and voila, butterfly wings on my nails. I love how this has turned out, and I think I will be keeping it on for a few days, its so summery and pretty. I will be trying it out in different colours too, I think a pink to magenta to purple combination would look lush :) but for now I'm happy with this one.

I started with using Virgin Vie Janet as a base colour (over my base coat/ridge filler) and then sponged on a little China Glaze Lighthouse, then gradually added China Glaze Free Love, and finally Finger Paints Chroma Coral, all sponged on to create a gradient effect. Next I used a cheap 2 way art pen/polish, using the thin brush to add on the black tips and some of the thicker lines, and then finished off the finer lines and touch ins with a nail art pen I had given to me. It looks just like a felt tip pen, and although trying to get an even flow through the nib without it drying up was tricky, it did the job. Last part was to add the white spots, I just used the pointy end of an orange stick and Rimmel white nail tip polish. Once dry I slapped on a couple of coats of top coat to seal it all in, and voila, butterfly wings on my nails. I love how this has turned out, and I think I will be keeping it on for a few days, its so summery and pretty. I will be trying it out in different colours too, I think a pink to magenta to purple combination would look lush :) but for now I'm happy with this one.

Wednesday, 3 August 2011
Rainbow Stripes Nail Art Manicure
I saw some lovely rainbow stripes with zebra print on Kayla Shevonnes blog here and wanted to do something similar, because I thought hers looked awesome. First I started out thinking I would use tape to get those crisp edges, but I couldn't find the sellotape and thought I would give it a go freehand. I used OPI Thanks so muchness for the red, China Glaze Lighthouse for the yellow, China Glaze Blue Sparrow for the blue, Funky Fingers Power Play for the Pink, and Funky Fingers Cheshire for the purple.
I was actually quite pleased with the overall result, apart from the purple showing underneath the pink at certain angles, but it wasn't really very noticeable in reality. I even got a compliment when I went grocery shopping, so thats always a good sign that it looked OK. I wore it like this for a whole day before adding China Glaze Fairy Dust, which I thought looked great and masked any flaws, all good except when I went to do the zebra stripes, I made a total balls of it and so I have now removed the whole thing. Like a real rainbow it was pretty, but didn't last! I will definitely be trying a rainbow mani again though, think of all the colour combinations and stamping possibilities, the list is endless. So for a first attempt, I liked it and I hope you like it too.

I was actually quite pleased with the overall result, apart from the purple showing underneath the pink at certain angles, but it wasn't really very noticeable in reality. I even got a compliment when I went grocery shopping, so thats always a good sign that it looked OK. I wore it like this for a whole day before adding China Glaze Fairy Dust, which I thought looked great and masked any flaws, all good except when I went to do the zebra stripes, I made a total balls of it and so I have now removed the whole thing. Like a real rainbow it was pretty, but didn't last! I will definitely be trying a rainbow mani again though, think of all the colour combinations and stamping possibilities, the list is endless. So for a first attempt, I liked it and I hope you like it too.

Monday, 18 July 2011
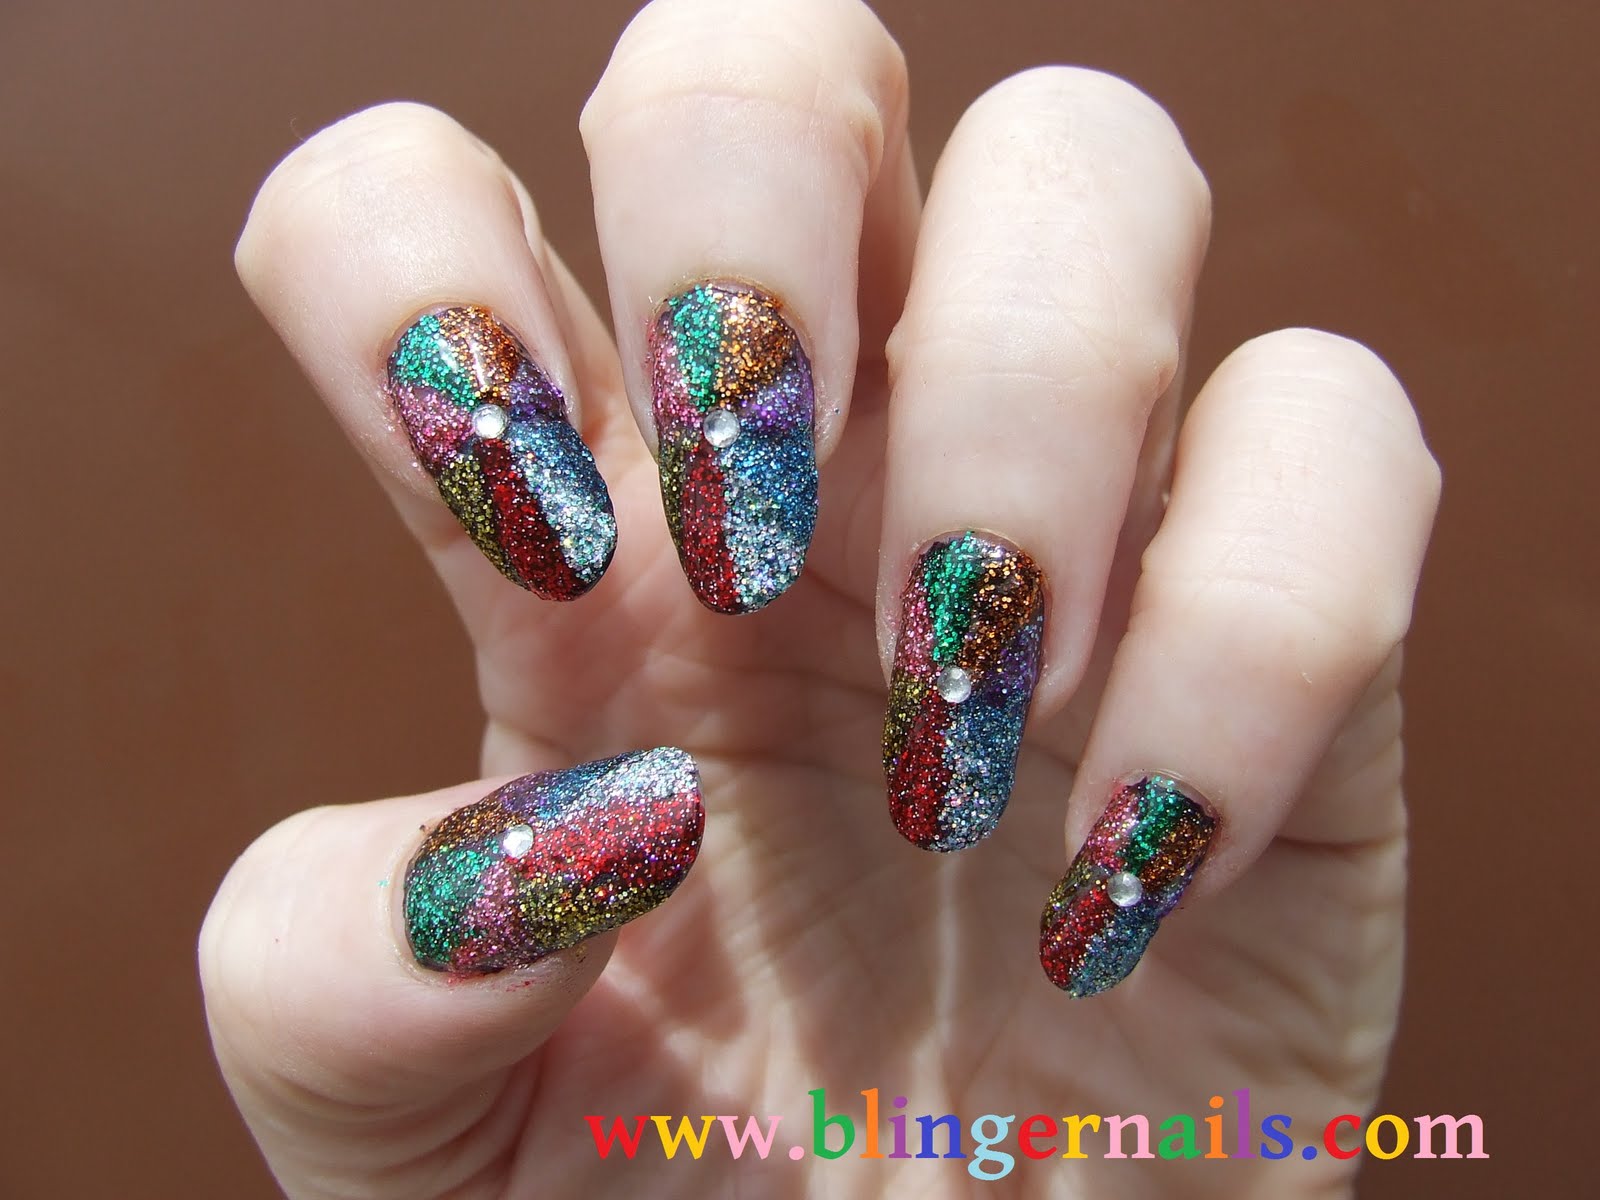
Monday Manicure - Glitter Bomb (Oh dear!)
Well here we are, another Monday and another Monday Manicure theme. This time the chosen theme (in the Polish-Aholics Anonymous group on Face Book) was 'Glitter Bomb'. Now, I can't be trusted with something like this, what I saw when I read this was, hey, go nuts with glitter RAARR! I regressed back to my childhood I'm afraid, to a time when I had never heard the phrase 'less is more' and I got out every bit of glitter polish I own. There are still quite a few missing from my nails, but I tried to get as many on there as possible! It was all good fun though, and I don't mind posting my fails, painting my nails is fun for me, and I never take myself too seriously (fortunately!)
So put on your sunglasses, here is my glitter bomb!

So put on your sunglasses, here is my glitter bomb!
Wednesday, 6 July 2011
My China Glaze Summer Manicure
The sun was shining and the birds were singing, and I wanted to do a cheerful really bright sunny manicure to match the weather. I started off using China Glaze Free Love, a fabulous orange polish which I swatched earlier in my blog here, and then I added China Glaze Frosty to the very tips, a bit higher than the line you would use for a french manicure. Once it was all dry, I used a small sponge, and sponged on China Glaze Lighthouse, gradually building up the colour, and with the white on the tips underneath it made sure the bright yellow colour really popped. This is what it looked like when it had dried. (Obviously this is pre-cleanup as I hadn't finished yet!)
 The next bit was a bit of a fail to be honest but I carried on regardless! I tried stamping a red flower design at the tips of the nails but it just didn't show up well enough, the polish wasn't vivid enough and it looked a bit bleugh, so I got out a fine brush and a bottle of China Glaze Phat Santa, and free handed in the red flowers over the top of the failed stamping. The flowers at the base of the nails went a little bit better, I stamped them using MAC Lustreware which is a metallic lilac. I embellished these with a little more Phat Santa and in turn I embellished the red flowers with a little lustreware for contrast. I finally finished off by using a dark yellow nail art pen and dotting the middle of the flowers and putting on a shiny topcoat. I am happy with the final result, it could have been better but could have been a LOT worse! It does actually look better in real life, because its smaller and doesn't show all those flaws like massive close up photo's do! The weirdest comment I have had for this design so far is from my brother who said "it looks like tangerine sick, but no really it looks OK I suppose" I guess coming from a big brother thats probably a compliment!
 I hope you like it :) xxx


Sunday, 3 July 2011
Color Club Wink Wink Twinkle, with Tape Mani, Fauxnad and not quite the 4th of July manicure!
Well, I have been busy doing all of the above. It didn't start out that way of course but then it rarely does! First I did a mani with Color Club Wink Wink Twinkle which like most things of a purple nature do not photograph well. The colour on my photo's is pulling far more pink than it is. In reality its more a neon purple/magenta with non sparkly glitter and more of a matte finish. Non sparkly, I don't know how that works, but it does work though and I wore this one for almost 24 hours before I had to mess!

First I put China Glaze Fairy Dust over it to make it shine and sparkle, then because the bottles were next to each other and looked pretty I decided to try a tape mani by adding China Glaze Blue Sparrow into the mix.
 By this point I was envisioning a 'not quite red white and blue', and since there are a lot of my USA friends celebrating the 4th July and doing manicures to match, I though I would add some 'not quite white' to match the other 'not quites' :) SO I used a fauxnad plate and using MAC cosmetics Lustreware as the polish I stamped a pretty flower and stem design. Then for the whole star spangled 4th July thing I added another coat of China Glaze Fairy Dust. It didn't need it to be honest, but I couldn't resist it anyway. So as a nod to my American friends and followers here is my 'not quite the 4th July' manicure. I hope you all like it.


First I put China Glaze Fairy Dust over it to make it shine and sparkle, then because the bottles were next to each other and looked pretty I decided to try a tape mani by adding China Glaze Blue Sparrow into the mix.


Monday, 27 June 2011
Monday Mani - Floral Design over NFU Oh 51
Well its Monday, and the Polish-aholics Anonymous group on facebook (you should really join if you're not already in it, its a great group) came up with the idea of Mani Mondays. Every Monday we all do our nails in the same theme which is voted by the group, and this Monday its theme is floral. I already had NFU Oh 51 on (thats a post of its own later) and I didn't want to take it off, so I thought what can I do! I went through my box of foils and transfers and miscellaneous nail things and found I had these lovely gold rose water slide decals. Does gold go with purple flakies, course it does! I hope you like it :)


Subscribe to:
Posts (Atom)