Tuesday 30 August 2011

piCture pOlish Giveaway!

Thanks to the wonderful girls at piCture pOlish (<<click here to go to their site) in Australia, I am hosting a giveaway to win THREE polishes of your choice from their own range (this doesn't include the Ozotic brand).  They have a fantastic choice of shades to choose from, brights, darks, neons, glitters, nudes, metallics...well you get the picture!  Here is a little bit about piCture pOlish


  was created when two girls dream't of giving their family & friends a thank you gift that would capture a special occasion. What better way to relive a moment than with a personalised nailpolish that was quirky & vibrant, that stands out from the rest!
  has now grown to include our own brand, with a beautiful range of fashion forward colours. Every shade tells a story!

our nail polish is better than chocolate! It's Australian Made, 100% fat free and has no artificial fragrances or flavours! A week on your tips and never on your hips!


They even have the option to personalise your own bottles (minimum order 10 bottles) how cool is that!  Imagine having your special occasion with co-ordinating nail polish in personalised bottles.  If I ever get married I'm doing that for sure.

The winner will be sent their polish directly from piCture pOlish, and they ship worldwide so that means the giveaway is open internationally.  You have until Monday 26th September to enter, and I will announce the winner on Friday the 30th September.  Good luck everyone, I wish I could enter this one myself!

GIVEAWAY NOW CLOSED

Sunday 28 August 2011

OPI Show It and Glow It!

Today, I have gone for bling and chosen OPI Show It and Glow It! from the Burlesque Collection.  I found this for a bargain price in a gift pack with Let Me Entertain You, and some shimmer body powder.  Obviously these were old stock so were being sold off cheap (fine with me!)

I just love glitter polish, and I covet all OPI glitter polish because they do it so very well.  If you click on the bottle shot and zoom in, you can see this is not just a purple and silver polish as you would first think.  Its a lot more complex than that, with small particles of purple, magenta, turquoise and silver glitter in there.  It applies nicely and builds up well with this being just two coats over a pink/lilac base coat.  The weather here has been miserable this week (though not as bad as my friends in the US dealing with hurricane Irene, stay safe over there xxx) so I thought if the weather isn't dazzling me, my nails can do it instead.  I just love OPI glitters, and can't wait to see some proper swatches of the upcoming Muppets Collection, more OPI glitters for me to covet!

Do you have a favourite glitter polish, or do you hate them with a passion?  I hate the removal but for me, its always worth it.  Pics are as always, click-able to see close up detail.

Thursday 25 August 2011

OPI DS Signature - Holo goodness a-plenty!


Since the sun is shining and this beauty was just sitting in my untrieds it would have been wrong not to try it!  Its hard to describe the colour, so after some thought I am going to go with dusty rose.  It looks darker, almost red/purple-ish in some lights, and lighter more pink in others.  The actual colour pales into insignificance however the moment you get sunlight on your nails, because this polish is crazy holo, joy!  

You don't even have to be in full sunlight with this one, it is crammed with the type of linear holo bling that makes grown women swoon.  The colour is so pretty, and would probably suit most skin colours, the formula went on beautifully, no drag in site and the brush gave perfect coverage with good dry time and a smooth and shiny finish.  I would have forgiven most things with this polish, but it had none, it was the perfect date and yes, I will be seeing it again.  These pics were taken with three coats, and I went without a top coat because the finish was so lovely on its own.  Pics are clickable for detail, and just because I am always saying that holo finishes are hard to photograph, I have also added a small video in direct sunshine, I hope you like it (I was stood in my back garden filming my hand with the neighbours kids laughing at me, see the lengths I go to hehe!)  Do you have a tissue ready?  Yes, ok then, commence drooling....

In the shade

Sunlight


Monday 22 August 2011

China Glaze - Turned Up Turquoise

Today I have China Glaze Turned Up Turquoise on my nails.  This is a neon, and most neons tend to have a matte finish, but I would say its more of a satin than a matte.  I like the finish on it though and of course if its glossy you are looking for, then there's nothing here a top coat can't remedy.  The negatives of this polish was that the application was quite frankly awful, love the colour hate the formula.  Most mattes dry very quickly and this was no different, but you had to apply really fast and the drag was, well a drag!  This left visible brush strokes, with the polish not really being workable enough to even them out.  I put on two coats to try to even things a little.  OK so thats the bad, so on to the good.

Is the fiddly application worth it, yes, it certainly is!  I don't have another colour quite like this one, it is pretty unique.  I have stated before I am 'not keen on green' but this one isn't just green.  Its turquoise with blue leanings, or is it teal with green leanings, or is it vibrant jade green.  I can't quite make my mind up, and neither can this polish.  In whichever light or angle you look at it, it is stunning and very pigmented, but I think it is a love it or hate it kind of colour.  As for me, well I do love it, and I'm glad I bought it.  I may have to get some more teal colours now.  The pics to my eye are showing a lot more of the blue in this polish where as in reality I see it as a lot more green.  There is a post on this blog here which shows the different colours much better than I could manage, have a look and you will see what I mean!


Thursday 18 August 2011

Barielle Elles Spell, W7 Layering and Fiery Flame Nail Art

Today I have a new manicure for you.  I put on a base of a single coat of random red/pink I picked up from my stash (I think it was China Glaze Ahoy) just to use as a colour base over my base coat, and then got to work.

The two polishes I used were W7 Red Dazzle, and the wonderful Elles Spell by Barielle.  I applied 2 thin coats of Red Dazzle  first.  This is a bright crimson red glitter, suspended in a red base, and applied very easily.  Once this had dried, I decided that I had to apply Elles Spell over the top, just to add to the sparkly red fest I was having.  Elles Spell is a flaky and I adore flakies!  It has flakes of red which flash to gold and green, suspended in quite a sheer dark plummy red base, which ever way you look at it, it is gorgeous!  If you don't have it already get it, and a back up!  Click on the bottle pic for a close up :)

After I had layered these two, I took some pics, this was definitely a win!  I am liking reds at the moment, so I was extremely happy with this.  (I must get China Glaze Ruby Pumps and try this combination with it, I don't have it, sacrilegious I know!)  You are going to want to click on this for close ups, just look at the colour and depth.


I wore this gorgeous creation for a whole day before I found myself with some spare time and, me being me I just couldn't leave it alone so.....I decided that it reminded me of glowing embers, it was practically alive so I added some nail art flames on the tips.  I have never done flames before but I thought I would give it a go, and I think its turned out OK.  Again I think this would work in many colour combinations, but for now I am sticking with this one and I am happily keeping it on for a couple of days.  I hope you like it :)


Monday 15 August 2011

Too Many Layers (or what happens when I get carried away!)

I was sat looking at my pretties last week, as I sometimes do just because I am a bit of a Magpie and like to look at shiny things.  I was wondering what to do with my nails (before I did the butterfly wings mani), which colour to paint them, glitter, flaky, nail art?  So many choices, and too much free time at that moment, so I grabbed some shiny, sparkly and lovely polishes, all gorgeous in their own right, and I tried ALL of them!  BIG mistake, I do love playing with layering, and experimenting with which polish goes with which colour but I really did get carried away with this one.


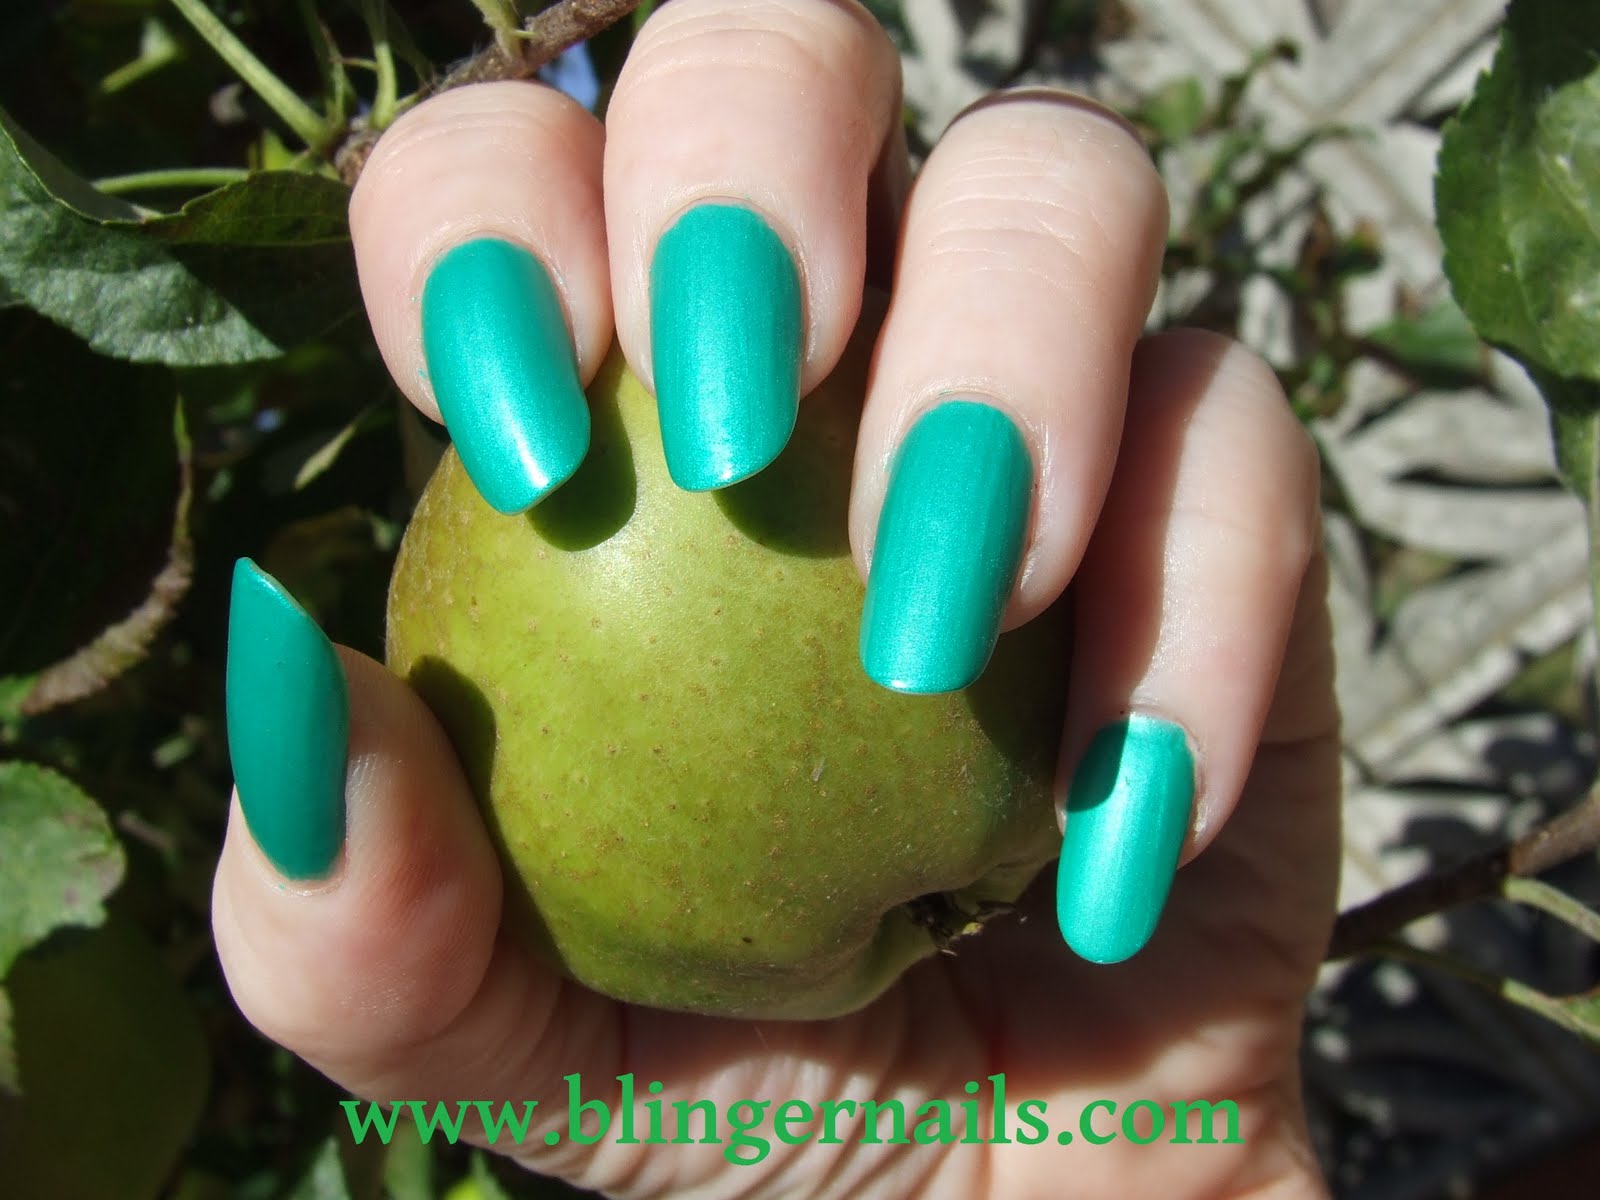
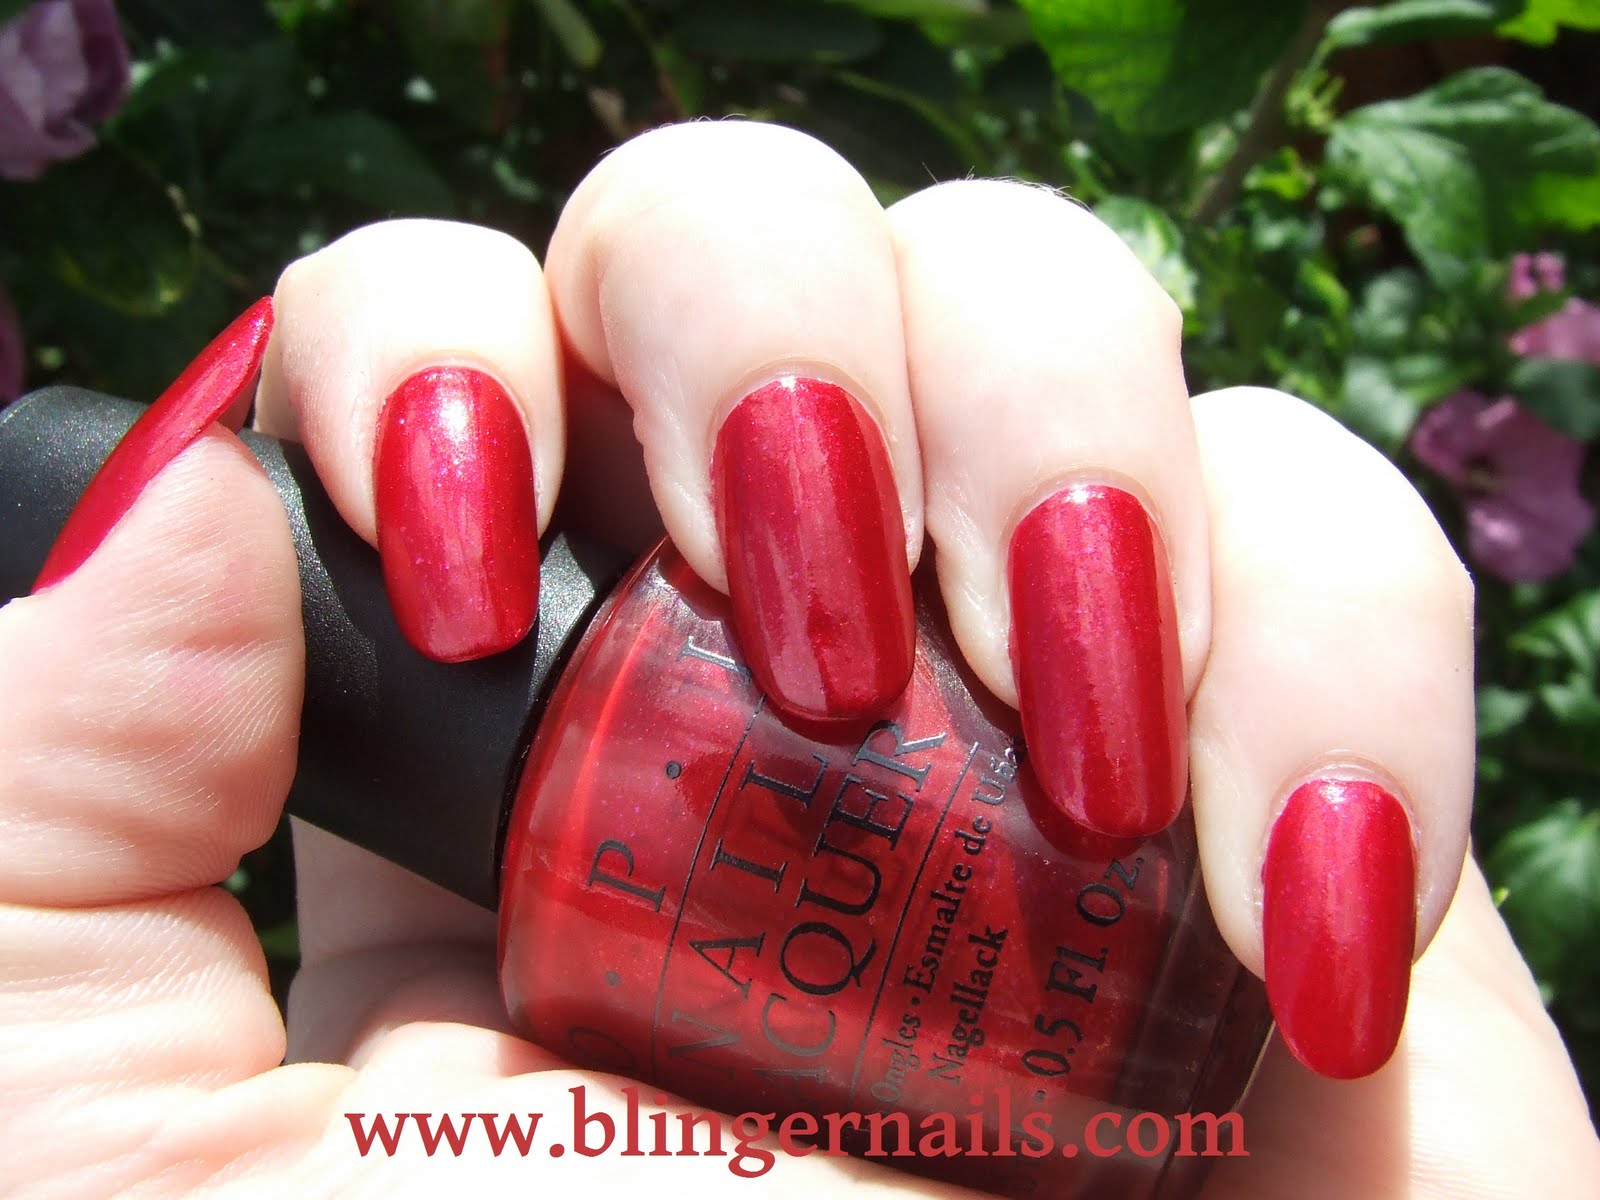
The polishes I used were OPI Thanks so Muchness, NFU Oh 51, Kleancolor Chunky Holo Fuschia and Urban Decay Burnout.  The final colour was lovely and as a result I now know how to create this without using the 10 layers that just wouldn't dry!  I only used four colours, but kept layering, until there was so much polish on, no wonder it wouldn't dry.  I went to bed with this lot on, and I could still leave an indent with my nail in the morning, so off it came.  I actually scraped it off as it was still tacky and just removed the residue with remover, so at least removal wasn't bad.

I started with my base coat, then 2 layers of the OPI, then a layer of Kleancolor, then 2 layers of Urban Decay, then another layer of Kleancolor, then NFU Oh 51, then another Kleancolor, then a shiny top coat.  10 layers in total, ridiculous!

The final result was extremely hard to capture, but believe me when I say it was spectacular, and was worth the 5 pics.  In the sunshine shots outdoors my camera was having a meltdown it was so shiny and sparkly.  It had it all going on, multichrome colour flashes, sparkle, glitter, flakes and a deep richness of colour, I will be doing a more sensible version of this soon, and when I do, I will of course share it with you all :)

Here are the pics, and please forgive the application of polish, this was pre clean-up, and since I removed it all anyway, there were no post clean-up pics!  Pics as usual are clickable for more close up detail.


Saturday 13 August 2011

OPI - Thanks so Muchness

After all the nail art, I thought I would do something plain (more nail art to come soon though!) and I chose OPI Thanks so Muchness.  This is a berry red colour, with tiny flakes of iridescent pink and I LOVE it!  I don't have many reds but this one is such a pretty one.  The micro shimmer pieces give it a glow and depth that give it an extra dimension to set it aside from 'just another red'.  If you click on the pics and zoom in, you can see the micro flakes in there.  It is one of the easier to find polishes from the Alice in Wonderland collection, so if you see it and you like reds, I would recommend this one.


Thursday 11 August 2011

OPI - Muppets!

OK I know you have all seen the press releases by now, but *squeeeeeeeeeeee* I'm just soooo excited about this collection!  The polishes look great on the PR pics, I can't wait to see them in person.  Are you all as giddy about the muppets collection as I am (I bet you all are!) the pic is clickable for a closer look :)


OPI and Olivia Rubin - Exclusive Sets

I just received this information from Lena White (OPI UK distributor) and they are releasing these exclusive sets.  The colours are from their already existing lines and they are available individually, but they are nice shades and if you don't already have them, then these are worth a look :)


Monday 8 August 2011

Butterfly Wing Manicure Nail Art

OK so I know this design has now been done a bazillion times already, and I'm about to make it a bazillion and one.  I hadn't done one of these butterfly mani's before and I always thought they looked really pretty and I fancied giving it a go after seeing pictures of other peoples and admiring them all.  I googled some pics of Monarch butterflies for a few ideas and inspiration and had another drool over other peoples pics of their versions of this, and then I thought what the hell, I have plenty of remover if it turns out to be an epic fail so I got stuck in!

I started with using Virgin Vie Janet as a base colour (over my base coat/ridge filler) and then sponged on a little China Glaze Lighthouse, then gradually added China Glaze Free Love, and finally Finger Paints Chroma Coral, all sponged on to create a gradient effect.  Next I used a cheap 2 way art pen/polish, using the thin brush to add on the black tips and some of the thicker lines, and then finished off the finer lines and touch ins with a nail art pen I had given to me.  It looks just like a felt tip pen, and although trying to get an even flow through the nib without it drying up was tricky, it did the job.  Last part was to add the white spots, I just used the pointy end of an orange stick and Rimmel white nail tip polish.  Once dry I slapped on a couple of coats of top coat to seal it all in, and voila, butterfly wings on my nails.  I love how this has turned out, and I think I will be keeping it on for a few days, its so summery and pretty.  I will be trying it out in different colours too, I think a pink to magenta to purple combination would look lush :) but for now I'm happy with this one.


Saturday 6 August 2011

China Glaze Snow with Fauxnad

I decided that as I have had darker and more vibrant colours on lately I wanted something that looked light, clean, and fresh.  Since I had China Glaze Snow sitting in my untrieds, I thought I would make use of it.  I put on two coats of Snow, the formula was OK but whites can tend to be a little streaky and this was no different.  It did even out nicely though.  After letting it dry I added a coat of China Glaze Fairy Dust, and it did look rather pretty just as it was then, but I wanted to add a little something extra, so out came the fauxnad plates.  I used a konad dark navy blue stamping polish (I'm sorry I don't know the name of it, it came in a kit) and used a design with really pretty flowers in an almost filigree type pattern.  I then finished off with a blue shimmer top coat.  This top coat I actually frankened but the nearest to buy would be CND Effects Sapphire Sparkle.

I only wish the sun had come out for me, as I haven't been able to capture the lovely blue shimmer, and the sparkle of the fairy dust, but it did turn out to be a really pretty manicure that looks way better on me than I thought it would.  I even had a compliment from my boyfriend who said 'oh white, wow I'm not used to seeing pale colours, well, not on you anyway'.  Now I come to think of it, I'm not sure that was actually a compliment.  Oh well, I'm taking it as one anyway!  I hope you like how it turned out, as usual the pics are click-able for detail should you wish.  

Wednesday 3 August 2011

Rainbow Stripes Nail Art Manicure

I saw some lovely rainbow stripes with zebra print on Kayla Shevonnes blog here and wanted to do something similar, because I thought hers looked awesome.  First I started out thinking I would use tape to get those crisp edges, but I couldn't find the sellotape and thought I would give it a go freehand.  I used OPI Thanks so muchness for the red, China Glaze Lighthouse for the yellow, China Glaze Blue Sparrow for the blue, Funky Fingers Power Play for the Pink, and Funky Fingers Cheshire for the purple.

I was actually quite pleased with the overall result, apart from the purple showing underneath the pink at certain angles, but it wasn't really very noticeable in reality.  I even got a compliment when I went grocery shopping, so thats always a good sign that it looked OK.  I wore it like this for a whole day before adding China Glaze Fairy Dust, which I thought looked great and masked any flaws, all good except when I went to do the zebra stripes, I made a total balls of it and so I have now removed the whole thing.  Like a real rainbow it was pretty, but didn't last!  I will definitely be trying a rainbow mani again though, think of all the colour combinations and stamping possibilities, the list is endless.  So for a first attempt, I liked it and I hope you like it too.