Sunday 31 July 2011

Ozotic Pro Elytra 528 - Layered over Ozotic Pro 506 yummmm!

OK first things first, an apology for not updating sooner, but a foster dog arrived at my house to love and look after until her forever home is ready and I have been kinda busy with helping get settled in and adjust to my three, so I haven't had time to update until now.  On the plus side though, I have made it a good one and worth the wait I think :)


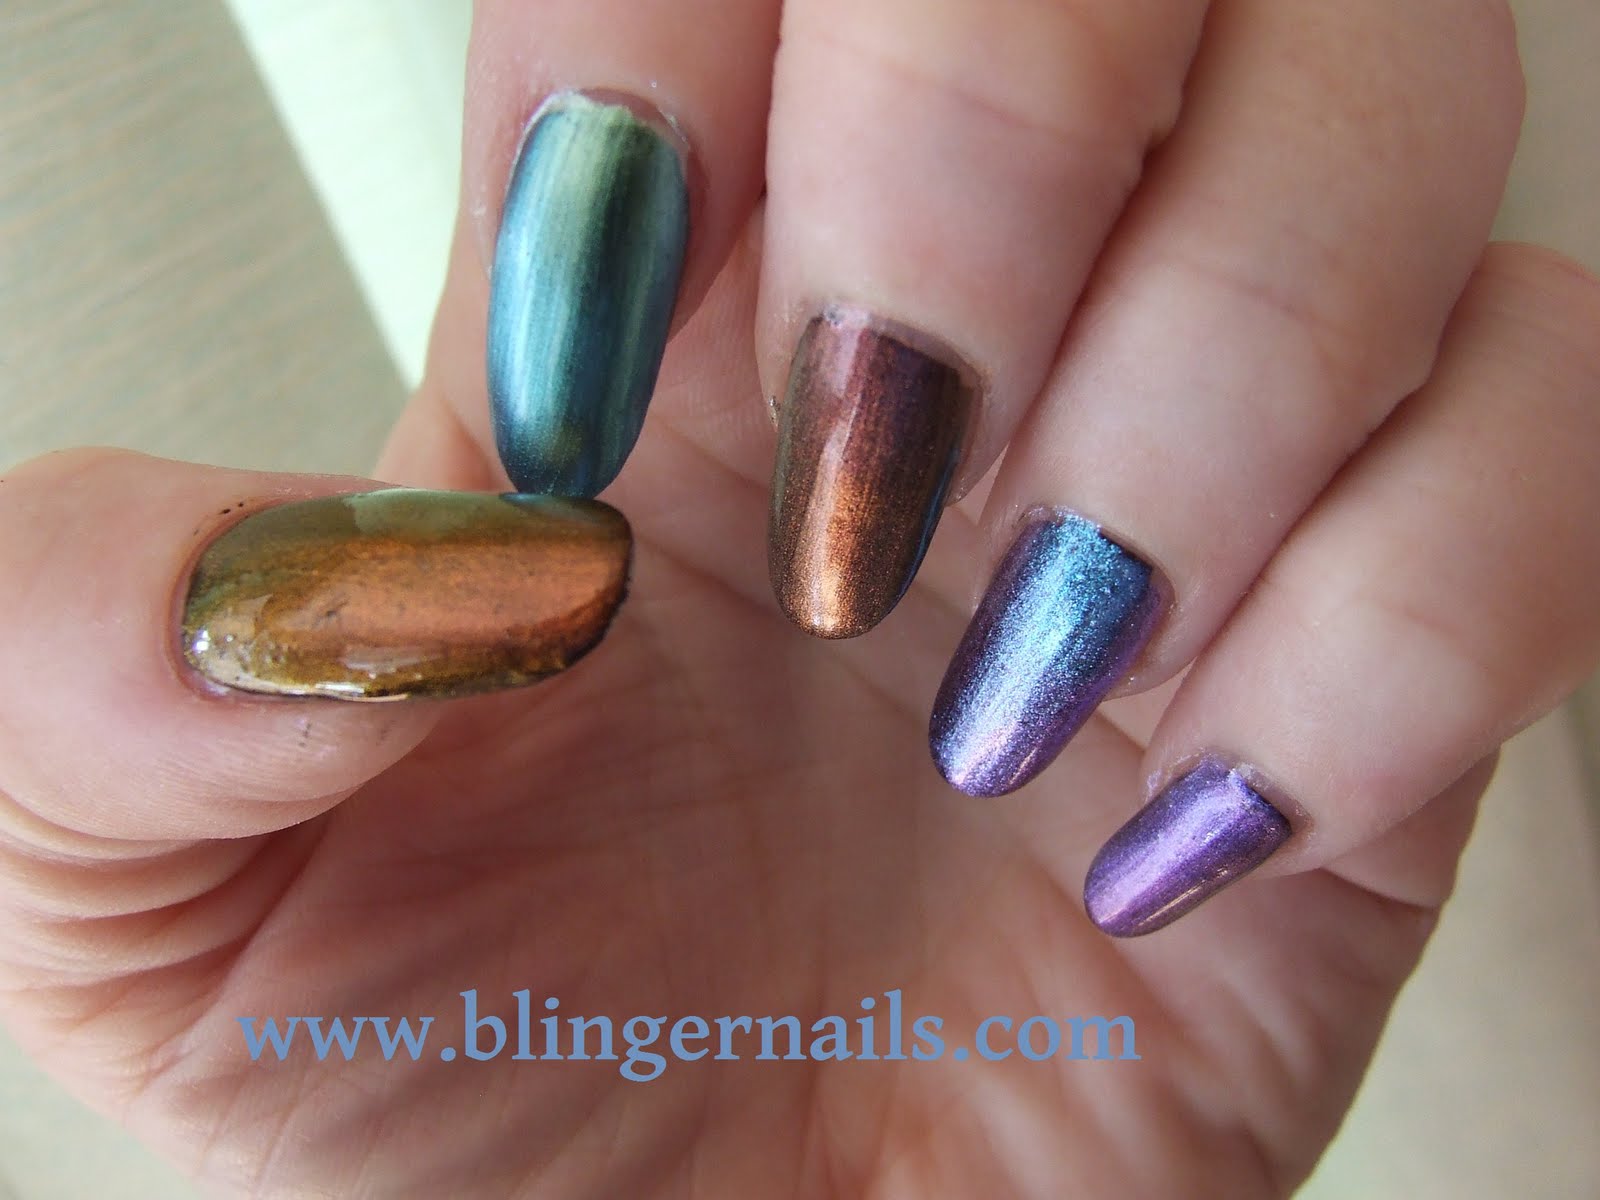
By now most of you know I love love LOVE multichromatics, and these are just as yummy as the Ozotic Pro 505 I reviewed earlier.  Basically, the 506 is practically identical to 505 apart from it is blue based, instead of the green/teal based.  Quite similar BUT different enough to warrant having both, which is fortunate really!  I put Ozotic Pro 506 on first over black, and totally forgot to take pics of it before adding the Elytra, but I just couldn't wait, I got too excited and carried away with the prettiness.  Now it has been warm and humid here, so there are air bubbles, please ignore them, I know I did!


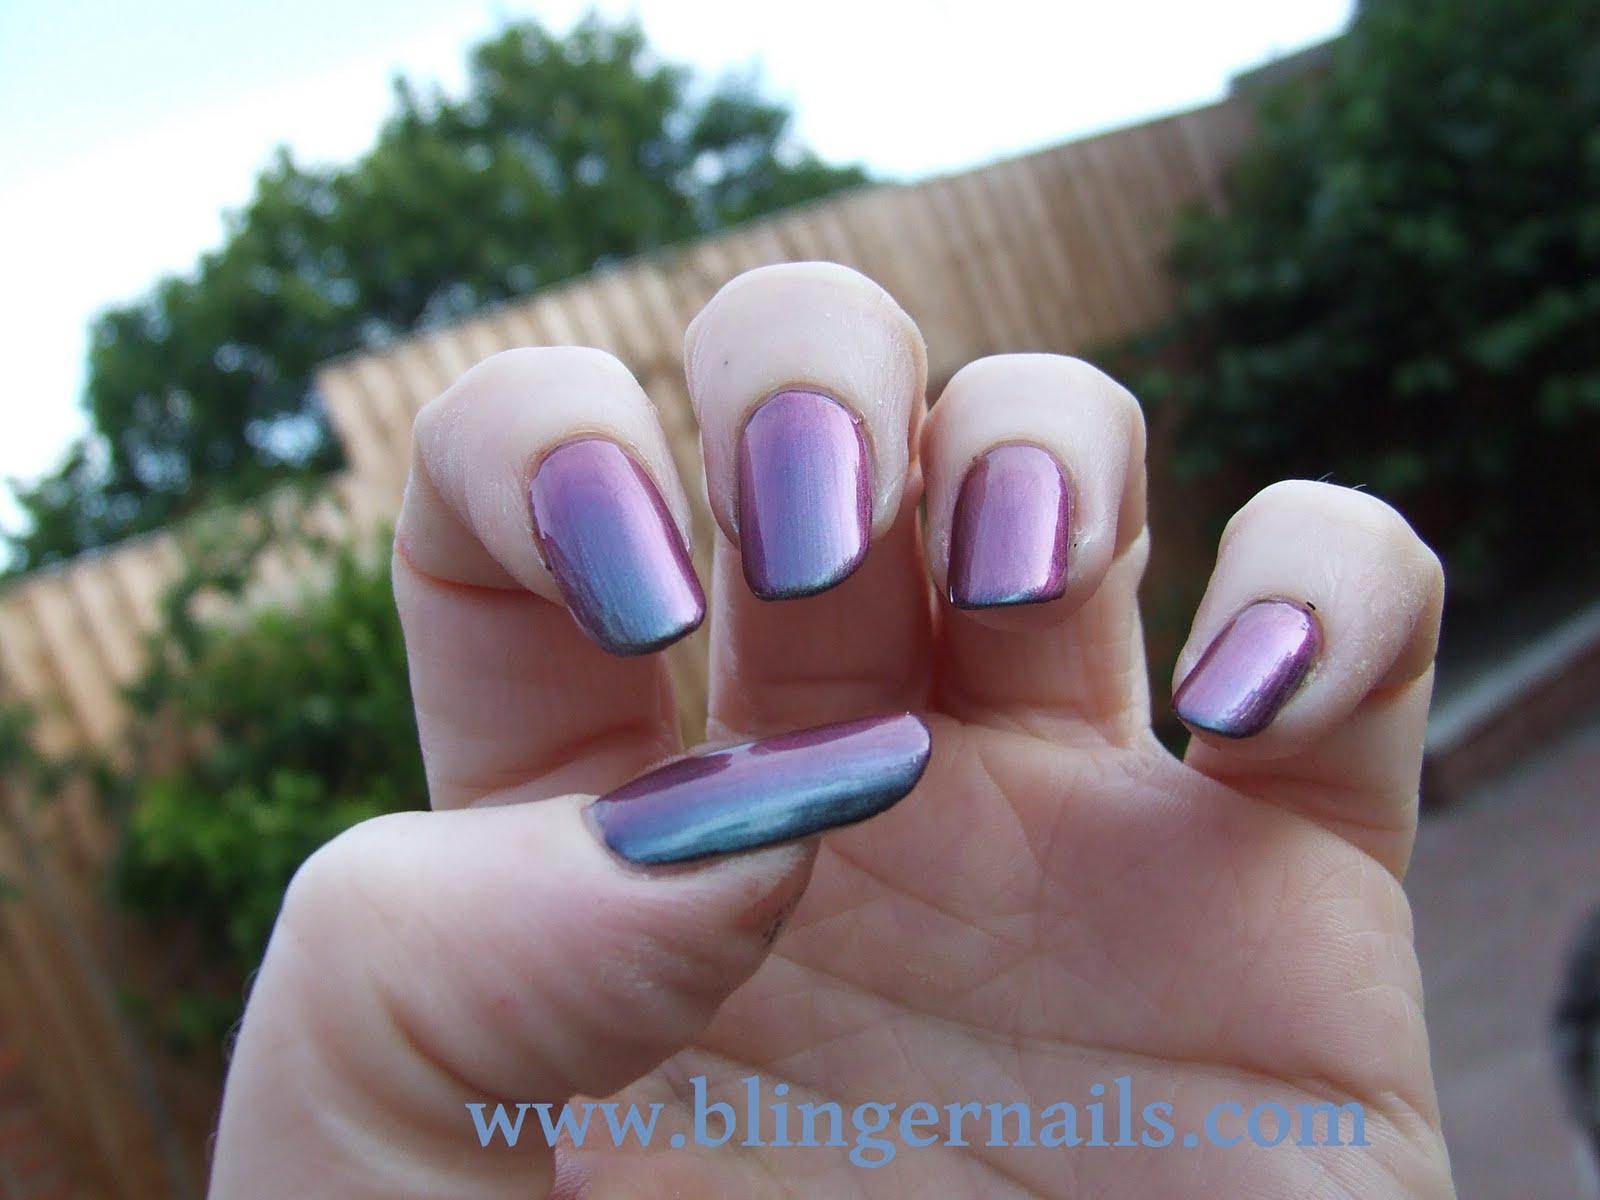
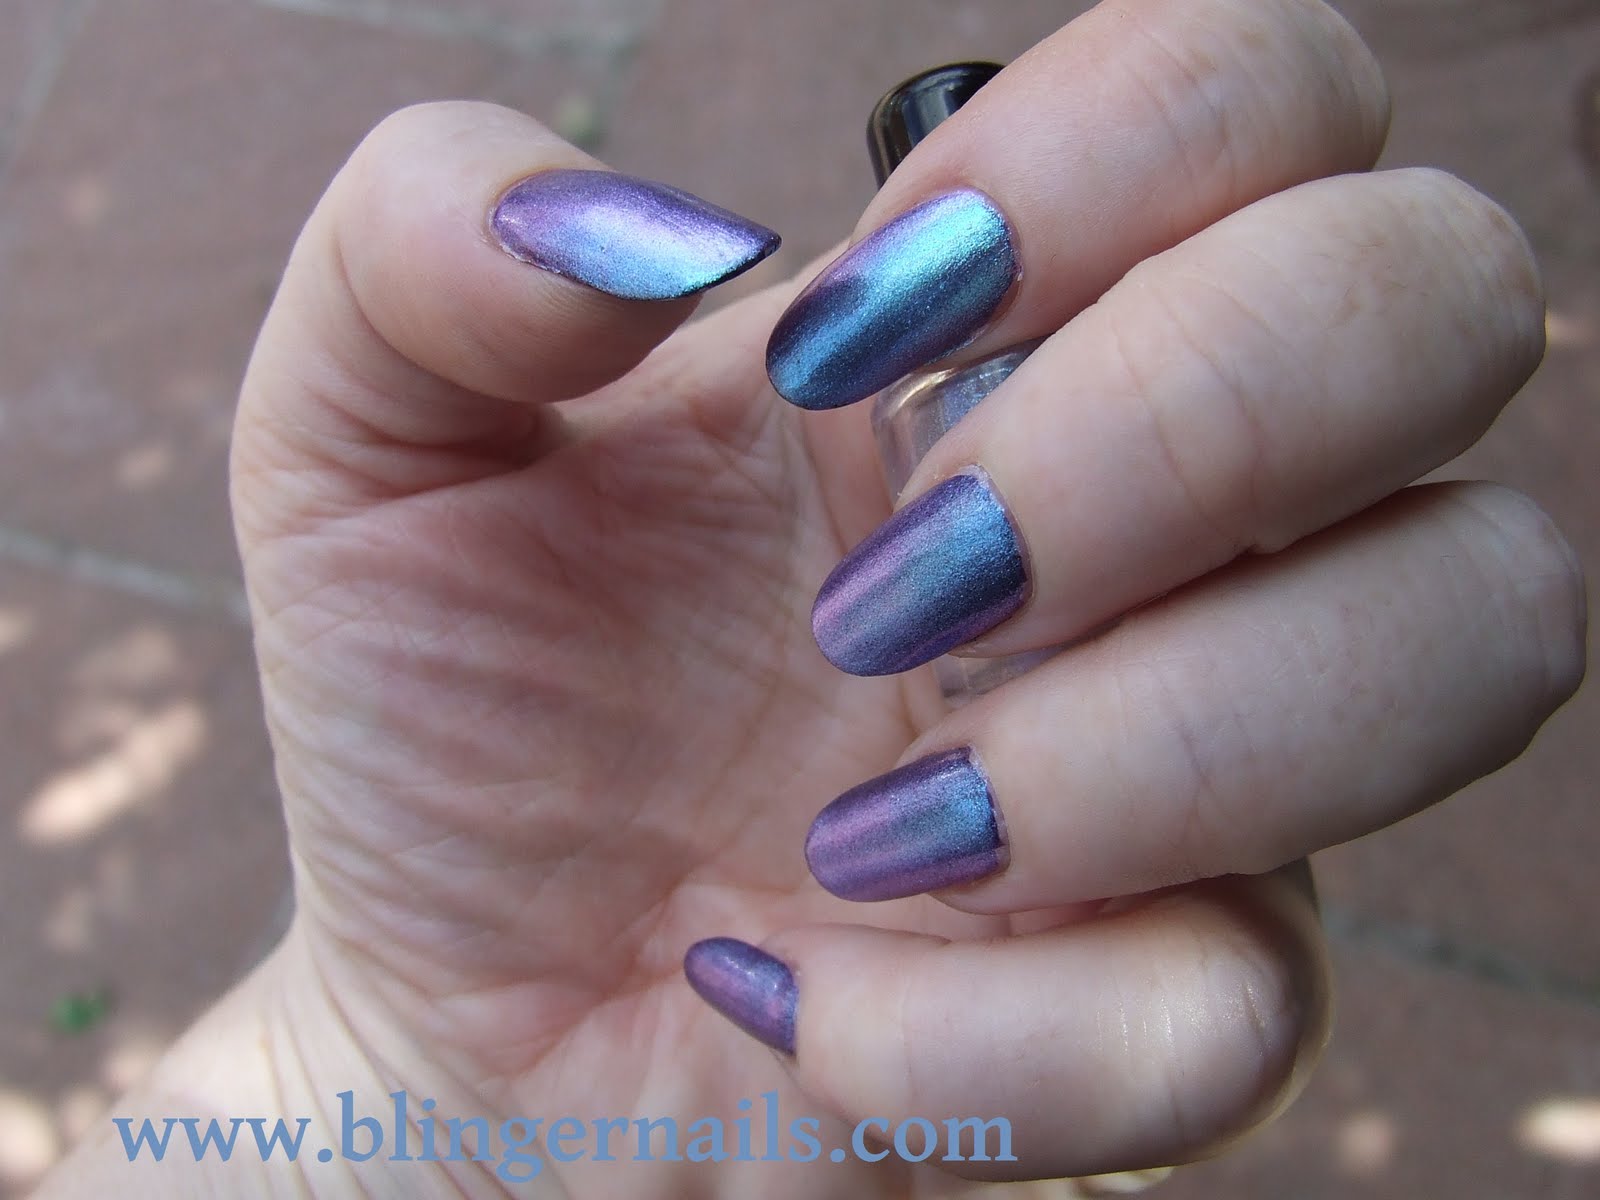
The queen of the show though is the Ozotic Pro Elytra 528.  I have tried, and again partly failed to show the full awesomeness of this polish, but  I think it is my new all time favourite, yes its that awesome!  It flashes purple, magenta, blue, green, and more subtly red and gold too.  All in the same bottle, plus its a glitter which dries smooth and not at all gritty but I did add a topcoat just for extra shine.  Let me say it again, multichrome glitter!  Isn't that just music to your ears.   I know I've said it before, but I am going to say it again, these are hard to photograph, but the pics are click-able to enlarge for a closer look.  I have also included a pic of the bottle to show the subtle red and gold in there, if you look its along the bottom edge of the bottle.  If you fancy treating yourself and getting your hands on these sexy bottles of loveliness, I bought mine from piCture pOlish in Australia.  They're not cheap but worth every penny, and they do realistically priced international shipping too :)  Right then, without further waffle from yours truly, on with the piccies!


Wednesday 27 July 2011

Accessorize - Pink Spice

I have for your delectation today ladies and gents, Accessorize Pink Spice from the Illusions collection.  It comes in a nice little 10ml bottle and I'm told it is a fairly good dupe for MAC's Bad Fairy.  Now I don't have that particular polish, but I DO have this one.  There are plenty of pics of Bad Fairy on the net to look up some swatches for you to judge for yourselves but from what I have seen, its close enough for me that I wouldn't want to buy both.  This one is a lot cheaper too at £4 a bottle, always good to save money, especially with me being jobless at the moment!


The formula on this was fine and went on smoothly, the brush was nice and soft and whilst I would personally have preferred it to be a little wider, it was fine and caused no problems.  The polish itself is a gorgeous colour, a rich magenta pink with coppery red duochrome flashes and a foil like finish, very pretty.  I liked this one because its not too girly, its more sophisticated, like pink would look like once it had grown up and started going night-clubbing.  I bought this polish when superdrug had a free delivery promotion, and I'm glad I did, its a keeper!  I want to try others from this range now, pah what was that I said about saving money?!


Monday 25 July 2011

piCture pOlish Blog Fest - Aphrodisiac

The amazing girls at piCtue pOlish in Australia are having a blog fest!  What that means is truly epic, all around the world right this very second, all at the same time bloggers like me are posting a review of one of their polishes.  Awesome idea right, and I am proud to one of the people chosen to be included in this event.

My polish is 'aphrodisiac' and the label says 'this potion leaves you with a magic touch'.  I love that all their bottles have a little 'story' like this.  The bottle itself is a nice square with a medium brush and rubberised grip feel to the handle.  The application was smooth as silk with a lovely formula going on like a dream and very easy to work with.  I did 2 coats but I could have happily gotten away with just one as it covered very well and was fully opaque.


Now for the most noticeable part of most polishes, the colour.  This is a very rich and dark blue based purple with a subtle shimmer to it.  If they hadn't already called it aphrodisiac, I would have volunteered aubergine as a name for it, it is that dark almost black purple type shade.  In sunlight it is clearly purple though, and the shimmer picks up beautifully, in natural light it looks very dark purple and in artificial light it pretty much looks black.  Whichever way you look at it though, I like it :)  Would I buy more polish from piCture pOlish's own range, you bet I would.  This is the first time I have used their brand and I am impressed with the quality.  If you want to try any of their polish range you can buy direct from their website http://www.picturepolish.com.au/index.php where they have a great range, including the wonderful Ozotic Pro polish too.  Even better, they also offer international shipping.  Want pics?  Of course you do, enough of my waffle heres fodder for your peepers :)


(Product sent to me for review) 

Sunday 24 July 2011

Chroma Shift, Colour Flip and Multichrome Frankens - Long Pic Heavy Post Alert!

Well, I have been in the lab again (yep, I know its the spare bedroom but indulge me a little) and I have been mesmerised at the array of pretties I have been playing with, to show to you today.  The very lovely Chris at Custom Creation Paints who kindly donated a gram of the spectacular SpectraFlair pigment for my recent giveaway, has now started to sell Chroma Shift pigment, which creates one of my most favourite things in the whole world, multichrome polish *sigh* but before I start let me just say I would always recommend taking the proper precautions and wearing a dust mask when mixing these pigments, or indeed any powders.


I have been working on this blog post for a few weeks now, and have worn a couple of manicures from colours made using these pigments, one which I am wearing (and loving) right now.  I have said in other posts that I love holo and glitters, but duochrome and multichrome colour shift polishes remain my most swoon worthy things (holo's come an extremely close second though, because they have that whole rainbow thing going on and are colour shifting in themselves).  So I got my hungry little mitts on some of these wonderful pigments, and started frankening the hell out of them.  Well when I say frankening, it wasn't hard to be honest I just mixed the pigment with some clear polish, and as a bonus it didn't take a lot of pigment to produce the right density of colour so a little will go a long way.  I just used a basic top coat so the pigment did tend to sink to the bottom when left to stand for a while, but I have a thin metal skewer I use to stir the pigment back into the polish when I want to use it and that seems to work fine for me.  Also steel ball bearings are a must too to shake it up with.


Right well I haven't got a colour wheel, (I thought I had a spare pah!) so I have used fake tips and swatched them on this.  All these pigments work best over black, or a dark colour.  On their own they are nothing much to look at, the magic happens in the layering.  These are all layered over black.


Clockwise by number:
1 - (For comparison purposes) Ozotic Pro 505
2 - Chroma Shift Aquamarine/Blue/Purple/Red
3 - Konfusion Red/Cyan/Blue
4 - Enigma - 3 Way Sparkle light blue/dark blue/purple
5 - Viola Fantasy Green/Violet
6 - Autumn Surprise Copper/Pink/Gold
7 - 3 Way flip Purple/Red/Bronze
8 - Royal Damask Purple/Cyan/Bronze
9 - Lapis Sunlight Turquoise blue/green/gold
10 - Tropic Sunrise Pale green/pink/gold
11 - Mauve/Copper
12 - Purple/Yellow
13 - Chroma Shift Aquamarine/blue/purple


I also swatched some as skittles so I could see what it really looked like on the nail.

In Bright Sunlight
In the shade at a different angle
Sorry for the application in these pics being a little sloppy, but I was kind of mixing and swatching at the same time (yes, I CAN multitask look at me go!)   The pics are clickable to enlarge for detail, but I think you can see the different colour shift between the two photos.  
The pigments used were, Thumb Mauve/Copper, Pointer Lapis Sunlight, Middle Finger Royal Damask, Ring Finger Enigma Sparkle, and pinky Konfusion red/cyan/blue.

I had already used the Chroma Shift Aquamarine/Blue/Purple/Red to do a full mani previously, and here are the pics.  It is very Ozotic-esque, and since I love the Ozotics then I was all over this.  It worked really well and the colour flips were obvious, this was 2 thin layers over a black base and I was moving my hands around like some trippy hippy looking at the colour flips, I loved this one!  What do you think?  This pigment is available from here if you want to try it for yourself.   (those are my pics on the listing, I am not affiliated but gave permission for their use because he liked them so much!)


The second full mani I did with these pigments, I absolutely love and am wearing right now.  It is the Enigma three way sparkle.  The pigment itself is a pain in the posterior because it is a really fine sparkly powder and gets everywhere no matter how careful you are, but it is sooooo worth it!  I don't know if this pigment will be available for sale, but I had to show you it because...damn, its hot!  It has a metallic, foil like effect, and shimmers and changes so beautifully.  It reminds me of the CND Effects polishes, and if I use less pigment to make more of a top coat than an opaque colour (or wait for the pigment to settle and use it without shaking it up as much) it looks pretty dupey to the Sapphire Sparkle one, at least compared to pics I have seen.  Unfortuantely I can't do a proper comparison because I don't have the CND one.  For this mani though I opted for the full pigment colour, and I'm glad I did.  Again this was two thin coats layered this time over a dark purple base of Orly Wild Wisteria.  I hope you like it as much as me.


I am happy with the photo's but they still don't show the colour flip off properly, these kind of colours are notoriously hard to capture but I think I have done a fairly good job of it.  I hope you have enjoyed looking at them as much as I enjoyed playing with them :)


(products sent to me for review)

Saturday 23 July 2011

Blingernails Giveaway - Winners!

After checking and verifying all the entrants, I used the form on www.randomizer.org to pick the winners.  I wish everyone could have won, but I will be doing another giveaway soon :)

The winners have been notified by email, (if I don't hear a response back from them in a week I will re-draw)


Anutka
for being the first prize winner, and she chose the SpectraFlair pigment :) - (Now claimed, gratz again Anna!)

Frøken Fine
for being the second prize winner, and she gets the China Glaze polishes - (Now claimed, gratz again Stine!)

Please can I say a MASSIVE thanks to all who followed and entered, I really do appreciate every single one.  I will be doing another giveaway soon, and in the meantime thankyou to all of you for reading my blog :D

Wednesday 20 July 2011

Ozotic Pro 505 Eclipse

I have on my lucky little digits right now Ozotic Pro 505, and I just don't know where to start with this one!  It is simply gorgeous, it is like an oil spill, its a rainbow in a bottle and yes, it does look just as awesome on the nail.  This polish on its own is sheer and doesn't look much to rave about, but its not supposed to be worn alone.  It needs to be layered, and when you layer it over a dark colour, BAM!  You are transformed from mundane to magnificent!  Its no secret I love glitters, I drool at holographics, but I fall at the feet of and adore multichromes.  Make no mistake, this isn't a duochrome with just two flashes of colour which you have to have your hand in some weird contortion to see.  No, this is a true multichrome.  It flashes a rich teal green, dark blue, purple, and reddish bronze, and it is breathtaking and very noticeable.  It is one of those you just can't stop staring at, and I even had comments from complete strangers when I went grocery shopping!

I ordered this from the lovely girls at piCture pOlish in Australia, and whilst its certainly not the cheapest polish I ever bought, it was worth every single penny.  In fact I have now ordered Ozotic Pro 506 Reef, and I HAD to also order Ozotic Pro Elytra 528, this one being a multichrome glitter how could I resist that!

These pics are Ozotic Pro 505 over Orly Wild Wisteria.  It is 2 coats of Ozotic and it went on perfect (apart from my application being a bit questionable, but hey I was excited!)  It has been on now since Monday, and its wearing very well and I have no plans to take it off yet.  I have tried to photograph it the best I can, but it has been quite dull with crappy weather, and these kind of polishes always seem to be difficult to catch properly.  If you click on the bottle picture you can enlarge it for detail, it shows the colour much better.  There are lots of much more awesome pics than mine on the internet anyway if you do a quick search for them.  I seem to have only been able to catch the blue, the teal (which is more pronounced in reality) and the purple but anyway, here are my pics of this stunning creation.


Monday 18 July 2011

Monday Manicure - Glitter Bomb (Oh dear!)

Well here we are, another Monday and another Monday Manicure theme.  This time the chosen theme (in the Polish-Aholics Anonymous group on Face Book) was 'Glitter Bomb'.  Now, I can't be trusted with something like this, what I saw when I read this was, hey, go nuts with glitter RAARR!  I regressed back to my childhood I'm afraid, to a time when I had never heard the phrase 'less is more' and I got out every bit of glitter polish I own.  There are still quite a few missing from my nails, but I tried to get as many on there as possible!  It was all good fun though, and I don't mind posting my fails, painting my nails is fun for me, and I never take myself too seriously (fortunately!)
So put on your sunglasses, here is my glitter bomb!

Saturday 16 July 2011

Sally Hansen Rock Star Pink & Fauxnad

I was loving my OPI Dim Sum Plum Mani, but it had been on for a few days and I wanted to switch it up a bit and have a new mani for the weekend.  I didn't feel like removing it and starting again so I did the lazy thing and painted over it!  I first added two thin layers of Sally Hansen Rock Star Pink, even though I know glitters are a pain to remove  I can never resist them.  I love this one, its so sparkly and colourful, and is made up of small glitter of red, magenta, blue and silver in a clear base and it was a perfect colour to use over Dim Sum Plum.  Here it is, before I added a fauxnad design.

Once this was dry, I added a fauxnad design, using MAC lustreware which I have used before for stamping.  Its a metallic lilac so went well with this I thought.   I hope you agree :) and I hope you like it.

Wednesday 13 July 2011

OPI - Dim Sum Plum

This one was on my wishlist for a while, I liked the swatches I had seen for this online, and now I have seen it for real, I LOVE it.  I am not really a pink kind of girl so this one suits me down to the ground.  It isn't pink, but it isn't purple either, if nature decided to make a magenta berry, it would be exactly this colour.  I wanted to call it raspberry but it isn't red enough to be that in my opinion, but hard as it is to describe, its lush!  It looks slightly darker on the nail than it does in the bottle, and the formula is great and very pigmented, I could have gotten away with only one coat if I was in a hurry.  I chose to use two coats and it applied perfect, not an air bubble in sight.  I have had this on for a couple of days now and it is wearing well showing only very slight tip wear.  I expect good quality anyway from OPI, and this one does not disappoint, and its all mine, I may hug the bottle in a little while but don't tell anyone OK :)


Sunday 10 July 2011

China Glaze - Mrs Claus

OK I know this is from the 2010 holiday collection and its Summer here, but it is such a pretty colour I think it works for summer too.  Theres the other thing too, which is I will wear what I like so ner!  Ah-hem, well anyway, the polish.  The formula was really good and easy to work with, and went on without a problem.  The colour is really pretty and is made up of pale pink glitter in a red base.  I love my glitters anyway so I freely admit I may be a little biased when it comes to glitters, but this one really is such a nice one.  It is very simple, no holo glitter, no multi sizes or colours but it works better for it.  It has a really shiny foil like finish, and in the sun it sparkles brightly and just looks so 'happy' its one of those warm cheerful colours I am glad to have in my collection.  (Please excuse the awful visible tips, top coat shrinkage strikes again!)


Wednesday 6 July 2011

My China Glaze Summer Manicure

The sun was shining and the birds were singing, and I wanted to do a cheerful really bright sunny manicure to match the weather.  I started off using China Glaze Free Love, a fabulous orange polish which I swatched earlier in my blog here, and then I added China Glaze Frosty to the very tips, a bit higher than the line you would use for a french manicure.  Once it was all dry, I used a small sponge, and sponged on China Glaze Lighthouse, gradually building up the colour, and with the white on the tips underneath it made sure the bright yellow colour really popped.  This is what it looked like when it had dried.  (Obviously this is pre-cleanup as I hadn't finished yet!)

 The next bit was a bit of a fail to be honest but I carried on regardless!  I tried stamping a red flower design at the tips of the nails but it just didn't show up well enough, the polish wasn't vivid enough and it looked a bit bleugh, so I got out a fine brush and a bottle of China Glaze Phat Santa, and free handed in the red flowers over the top of the failed stamping.  The flowers at the base of the nails went a little bit better, I stamped them using MAC Lustreware which is a metallic lilac.  I embellished these with a little more Phat Santa and in turn I embellished the red flowers with a little lustreware for contrast.  I finally finished off by using a dark yellow nail art pen and dotting the middle of the flowers and putting on a shiny topcoat.  I am happy with the final result, it could have been better but could have been a LOT worse!  It does actually look better in real life, because its smaller and doesn't show all those flaws like massive close up photo's do!  The weirdest comment I have had for this design so far is from my brother who said "it looks like tangerine sick, but no really it looks OK I suppose" I guess coming from a big brother thats probably a compliment! 

I hope you like it :) xxx

Sunday 3 July 2011

Color Club Wink Wink Twinkle, with Tape Mani, Fauxnad and not quite the 4th of July manicure!

Well, I have been busy doing all of the above.  It didn't start out that way of course but then it rarely does!  First I did a mani with Color Club Wink Wink Twinkle which like most things of a purple nature do not photograph well.  The colour on my photo's is pulling far more pink than it is.  In reality its more a neon purple/magenta with non sparkly glitter and more of a matte finish.  Non sparkly, I don't know how that works, but it does work though and I wore this one for almost 24 hours before I had to mess! 


First I put China Glaze Fairy Dust over it to make it shine and sparkle, then because the bottles were next to each other and looked pretty I decided to try a tape mani by adding China Glaze Blue Sparrow into the mix.  

By this point I was envisioning a 'not quite red white and blue', and since there are a lot of my USA friends celebrating the 4th July and doing manicures to match, I though I would add some 'not quite white' to match the other 'not quites' :)  SO I used a fauxnad plate and using MAC cosmetics Lustreware as the polish I stamped a pretty flower and stem design.  Then for the whole star spangled 4th July thing I added another coat of China Glaze Fairy Dust.  It didn't need it to be honest, but I couldn't resist it anyway.  So as a nod to my American friends and followers here is my 'not quite the 4th July' manicure.  I hope you all like it.